Blog
5 Steps to Deploying Long-Tail PPC on Amazon
Published On August 8, 2017
We are nearing the end of an era. The average CPC winning bid for Amazon PPC is up over 20% in the last year. A jump on par with what we have seen in 2016, 2015, 2014, and so on. The days of spending pennies on the dollar to target top-level terms is finally coming to a close, but it does not have to be the end of your advertising campaign crushing it on Amazon. It simply calls for a shift in strategy.
Every major search / advertising platform goes through some readily observable phases. First you have a couple of crafty marketers that jump into the program early and crush it, followed by a few more, until finally the CPC either doesn’t make sense at the top level, or the margins are razor thin. Then a few, even craftier, marketers abandon those generic top-level keywords in favor of high-converting long-tail keywords. We’ve reached the long-tail stage on Amazon, which means you have an excellent opportunity to get a leg up using long-tail keywords while your competition continues to force an outdated and overpriced PPC strategy. Here are five short steps you can take today to make sure you stay ahead of the curve:
STEP 1: Build Your List of Long-Tail Keywords
When we were building Scientific Seller, locating these long-tail niche keywords was the top priority we had for the software, and we feel we do an excellent job at it. In the example below, I am using data from just one search that took the seed keywords “razor, electric razor, clippers, and electric clippers.” Here are some of the top Stuff Words the system returned:
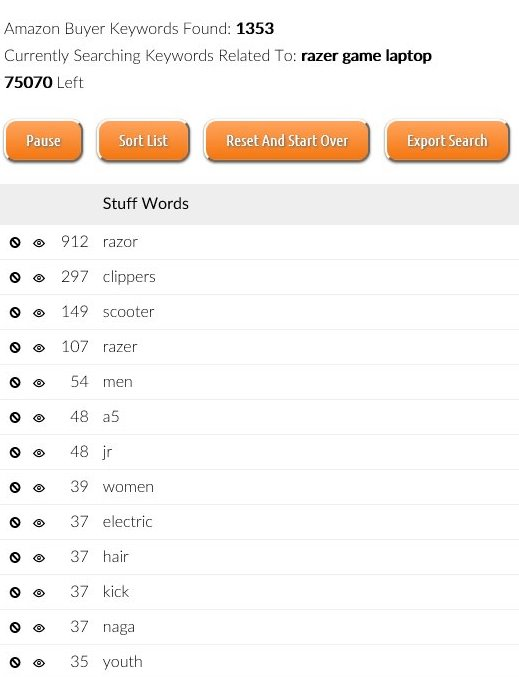
Right off the bat we see there is some significant crossover another product category: scooters. We want to remove the unrelated “Stuff Words” to ensure they are not appearing in our export (a premium feature you can try for free).
Click this symbol:  to remove a “Stuff Word.” The line should now look like this:

Your new Amazon Buyer Keyword list without terms including the removed “Stuff Words:”
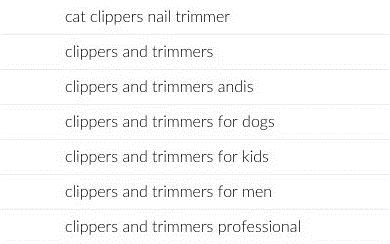
NOTE: While we no do want to target these terms, it is important to track them for potential use as negative keywords in our campaigns.
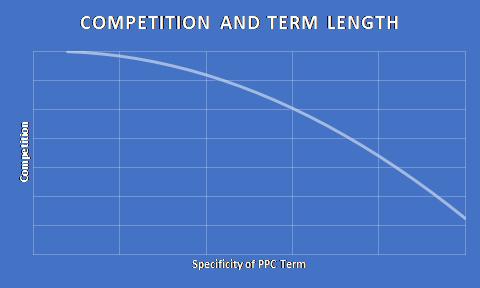
Once you have purged all the unrelated terms, your list is ready. I recommend prioritizing terms that include a “Stuff Word” that appears frequently, and is also 4+ words in length. The more specific you are to your product, and the longer your term gets, the less competition you will encounter. The less competition you encounter, the less you pay for clicks.
STEP 3: Prepare Your Listing
Now that our list is exported and ready for use, we need to place it into our listing so we can target it through Amazon PPC. I will not go in depth here as our “Stuff Words” PDF does an excellent job of covering the topic. If you have not already, please give it a read here.
The basic idea is to include each “Stuff Word” found in any of the keywords or phrases you plan to target through PPC in either your title, bullet points, brand name, or search terms section. You only need to include each word once, so be careful you do not repeat a bunch of “Stuff Words” over and over (unless you are testing the verbiage of your title or something like that).
STEP 4: Determine Your Maximum Bid Amount
You have probably been introduced to this concept before. Some folks call it your Advertising Cost of Sale (ACoS), others just calculate their net profit margin per sale and make sure to always spend less than that. No matter your approach, the core concept remains the same: figure out the maximum amount you can spend on advertising and still make an agreeable profit. Some sources will argue you should pay attention to your break-even point, an idea I vehemently disagree with. If you are just barely breaking even on a product, it means you are ignoring other more profitable opportunities while wasting time on something that is failing to make you money.
Instead, try looking at the number of units you’ve sold in the last 30-60 days, take your net profit margin (adding advertising expenses back in) and multiply them. Then figure out what amount of profit you think is worth your time and subtract it from that total. Dividing by the total units sold gives you your upper bound Advertising Cost of Sales:

Obviously, this is a very rough calculation, and you may be lacking the necessary data to calculate it. If that is the case, just plug in some arbitrary number of units sold and supplement with guesswork. It will give you an idea of where you stand as you approach setting up your PPC campaign. This is something you will want to recalculate on a near monthly basis anyways, so the first run does not require 100% accuracy. The whole idea is to start thinking about how valuable clicks really are for you, and if the advertising market is over or under priced. It also forces you to question if your product is still even worth the time you are investing in it, or if you should be pivoting to a new product.
STEP 5: Experiment and Test… Constantly
We are now ready to take what we have learned and incorporate it into our PPC campaigns. There are a ton of questions pertaining to how to structure your campaign: auto vs manual, exact vs broad vs modified broad vs phrase match, how and when to incorporate negative keywords, etc. They are all important questions and worthy of exploration, however, for brevity we are going to focus on setting up one manual campaign using exact match targeting.
What we are looking for is the star terms: terms with low competition and high conversion ratios that are hyper related to your listing. The trick here is to track your Cost per Action(CPA or in this case CPC) and your CTR. Your final click to sales conversion ratio is important, but if you have a high CTR and a good CPA that lies well within your targeted ACoS per item, you may want to start by analyzing your listing (or perhaps the product itself) before axing the PPC term. It is always tempting to blame PPC when it is the most obvious item costing you money, but do not ignore what it may be trying to tell you. Consider reworking your title, description, bullet points, etc.
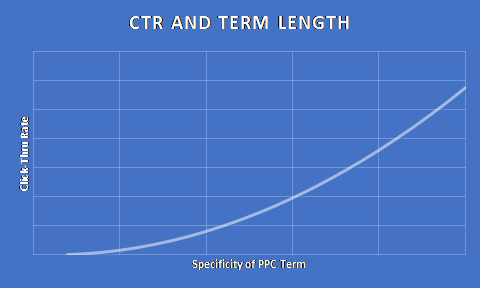
Once you have a live campaign filled with your terms, you need to start tracking those KPIs. The longer and more specific a term is, the more likely that it is only served to folks looking for it. Imagine if you target “running shoes.” The searcher could be looking for men’s shoes for trail running to kid’s shoes for running outdoors. Whereas if you target “outdoor running shoes for diabetic foot pain in Labradors,” odds are your searcher is going to be the person you are targeting, and it will entice a click. Any term that is no following the trend of increased KPI such as CTR is most likely a candidate for the chopping block.
Once you are confident your listing is optimized (especially if a few exact match PPC phrases are crushing it) it is time to start picking winners, losers, and question marks. Terms that simply aren’t getting the job done get removed. Winners stay (you may even consider setting up a second campaign specifically for terms you plan on keeping around). The question marks are terms you want to give a bit more time. Simply rinse and repeat the steps above for a new batch of terms and plug them into your test campaign/ad group. It cannot be emphasized enough that this is and will always be an on-going process. Stagnation in PPC monitoring and experimentation will lead to stagnation in performance, which is why you need reliable software helping to propel your efforts. Here at Scientific Seller, we are always interested in hearing your thoughts and helping in anyway we can, so feel free to drop us a line anytime.
